Lyons Photography, Inc.
  • BUSINESS
    • Drone + Scenics
    • ARCHITECTURE
    • Business, Branding & Lifestyle Portraits
    • MOSTLY FOOD
  • THE ARTS IN CINCINNATI
    • THEATRE >
      • ORCHESTRAL
      • VOCAL
      • Learning Through Art
  • PHOTOJOURNALISM
    • NEWS ASSIGNMENT & FEATURE STORIES
    • DOCUMENTARY
    • INTERNATIONAL
    • SPORTS
  • MISSION
    • Lyons Photography, Inc. Photo Journal
    • Photographic Approach
  • Contact

Photo Journal

YOU CAN'T SNOW THE SNOWMAN!                                                                   by: Mark Lyons/Lyons Photography, INC.

2/21/2015

2 Comments


Shooting in the Snow


Many have been rushing out into the snow to capture those beautiful scenes before the magic melts away. Shooting in the snow is no mystery; however, for many it can cause frustration because they struggle to understand exposure, or simply haven't learned yet how a camera "sees and determines" exposure.  I'm hoping this article helps with that challenge.

Your camera is not like your eye. It can only see a limited range of tones, and it adjusts due to the controls and parameters set by the operator. Those new to photography might like the automatic settings at first so they can see what happens. Many times they experience "happy accidents" which encourage more automatic setting photography. Shooting like this in snow is where you learn that “automatic isn't really automatic,” and that it can surely have its drawbacks.

Your  camera’s metering system wants to make everything it sees 18 % grey (some say 12% gray).  Check out the image of the grey tone like a grey card seen in the gallery at the very end of this article. Your camera's primary function is to gather information via an image sensor and capture it, or make a picture.  The meter in your camera is there as a help, but like we just stated it converts whatever you point your lens at, and exposes it as 18% grey.  This can be fine in a normal scene with a range of tones; for example, shooting in your back yard on a spring day with young children. The green grass, the multi-colored flowers, and the clothes of the children usually offer a varied range of tones that the camera meter mixes together, and often comes up with an exposure that is fairly close to a good exposure.

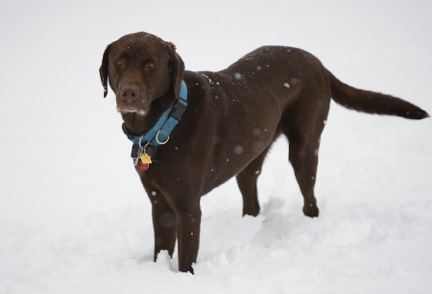
However, in snow it is a different situation because in the example we've got two tonal extremes; at one end of the tonal values scale a dark, chocolate lab and at the other end, a blanket of white snow.  Remember when I said the camera likes to make everything it sees 18 % gray? It will do that to the snow. Thus when you use the automatic settings or even on manual and you meter off the snow it will want to give you an exposure that turns the snow grey, or underexposes the shot.  In the gallery of photos below this is what happened in the photo at the top right.  It is a photo of very challenging opportunity for the camera, our chocolate lab “Bear” is standing looking very dark in the snow.   The easiest way to get the correct exposure it not to meter off the snow such as I did in the gallery at the top right.

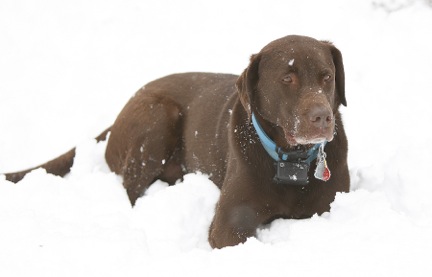
It's preferable to meter off of something that would be close to 18% gray such as your faded blue jeans, or a medium-tone automobile. Check out the shot in the gallery at the bottom right after metering off something 18% gray. Note also that we can see him along with a little detail in the snow.

Directions:
1. First meter off something that is 18% grey (eg. faded blue jeans).
2. Note the exposure, and work in the manual setting.
3. Be willing to adapt to the light as you shoot.

(Remember the screen on the back of your camera is not necessarily coordinated with the light meter in your camera.  It may actually render a scene too bright or too dark.  Stick with what your meter is telling you in your camera, upload the images, archive and send off a few to your photo service provider.   What the screen on the back of your camera, and your computer screen and what the lab prints may be altogether different.  With practice, you can learn what to expect from all three, and adjust accordingly. This takes time, and practice.)

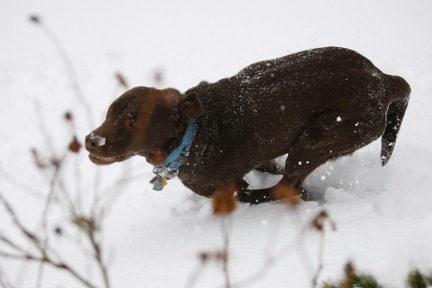
You may find that you have to adjust the exposure as you go from a brighter area to a dimmer spot. And you may have to open up ½ stop to compensate.  Check out the darker image in the gallery on the bottom left as I shot Bear near the house where the tree was blocking some of the light from the sky.

Conversely, if you meter off something very dark, such as Bear’s coat, it will want to give you an exposure that is too bright or a scene that is over-exposed.  Why? You are allowing it to essentially turn his dark coat much lighter (18 % gray). Note the loss of detail in the snow.  Check out the image in the gallery at the bottom in the center.

If you decide to shoot in the automatic setting for your camera, and taking pictures in the snow, then note the exposure when you meter off the snow; next note the exposure when you meter off something close to 18% grey and adjust your Exposure Value-EV Compensation settings (approximately +2).  That should fool the meter to over expose the shot by 2 stops and get closer to the correct exposure.  Don't forget to take it off that setting after you are done with your picture taking out in the snow.

I hope this helps. Feel free to send questions:  mark@lyonsphotography.com

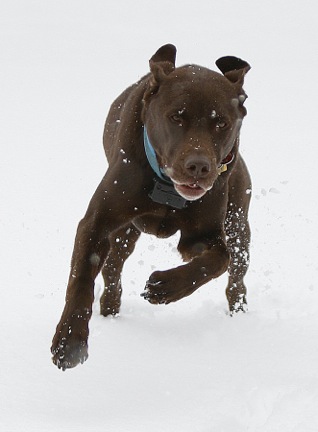
As for me I am off for more “Bear” hunting.  Check out the image at the bottom right for that "hunting look."

2 Comments

MAKE IT TO THE FINISH LINE

1/20/2015

0 Comments

 
Picture
Article & Photo: Mark Lyons

I always challenge my students to learn as much about the technical side of photography, mainly physics, as they grow their skills. The more you know how it all works, the easier it is to use you equipment and light to make both interesting and dramatic photos.

One idea that intrigued me early in my photographic career, was the "finish-line camera" and photo-finish photography. This type of photography, invented in the 1930’s; below is an explanation of its origins.

(1) “Historically, in the United States motion picture cameras had been used since the 20s for recording race-meets but were unsuitable for photo-finish photography as the frame-rate was too infrequent to catch the critical instant horses or dogs reached the finish-line. This record was achieved by using a special slit camera. Lorenzo Del Riccio, a Paramount Pictures motion picture engineer improved the circular flow camera, a device which had been invented in the 1930s especially for the purpose of photographing moving objects. The first racing club to make use of Del Riccio's 'Photo-Chart' camera for photo-finishes was the Del Mar Turf Club in California at its inaugural meeting in 1937.

Unlike conventional cameras the circular flow camera used a single vertical slit instead of a shutter; a strip of film moved horizontally across the fine vertical opening located in the focal plane. This limited the field of vision to no more than a few inches, the restricted field being aligned with the vertical line on the winning post on which the lens was focused. The strip film moved across the slit in the opposite direction to the race and at substantially the same speed as the rate of movement of the image of the horses as it passed the finishing line. This kept the image of the horses more or less stationary with respect to the film. As soon as the first horse started to pass over the line, the camera began to record its image on the moving film from the nose backwards along the length of the body in succession. This produced a strip photographic record of the horses as they passed the vertical plane (winning post). Film was advanced continuously at a pace equivalent to the average speed of a racing horse, resulting in distortions of length but still preserving the order of finishers.

Improvements were developed, including that made in 1948 by Australian Bertram Pearl whose system incorporated a mirror and neon-pulse time signature in the winning-post which would provide a precisely aligned image in which both sides of the horses could be viewed, and on which the neon left a set of stripes at 100th/sec intervals for accurate timing. If the reflected image of the horses aligned vertically exactly with the foreground image, it was proof that the camera was not viewing the finish-line at an angle (and therefore incorrectly recording the horses' relative positions). Pearl's partner was his friend, society portraitist Athol Shmith.[1] Shmith’s contribution was to formulate means to speed the processing of the strip of negative down to 55 seconds and then to a rapid 35 seconds.[2] These times rivalled even the ‘instant’ one-minute picture processing by Edwin Land’s Model 95 which became available at that time.”

Understanding the principal of how the slit and the moving film work together, I used some algebra and physics to create the effect using a professional film camera at a summer track meet when I worked at the Clarion Ledger and Daily News in Jackson, Mississippi.

Now, how did I do it? I understood that the film needed to pass by a slit as the runners were moving. I first took my Nikon F2 and recorded the average time it took the film to rewind in the camera (about 6 seconds). I then measured the length of the film (about 62 inches); in order to achieve an exposure calculation I needed the size of the slit (I chose 1/64 inch). Sixty-two inches times sixty-four is 3968 divided by six is approx. 668. Therefore I would be running the film past the slit at about 1/700 sec. In order to get a decent amount of depth of field I used a 50mm lens and chose f 5.6, which put me about ASA 200 on a sunny day (exposing the average for shadows and highlights). I didn’t like the 200 ASA slide film in those days so I used 100 ASA and pushed it one stop.

I used two pieces of opaque film I pickup from the guys in the back shop, cut them square and taped them 1/64 inch apart in the middle of the film plane. Next loaded the film and shot the whole roll with the lens cap on. Finally I focused the lens, set the camera shutter on “bulb,” and started the rewind process a second or two before the runners reached the finish line so that the film would be running a consistent speed.

If you try this, use some out of date film first as you test your exposure so as not to waste, then record your best results (practicing with different f-tops and slit sizes) and then shoot the "good" film.

Another tip: Since the background and anything else that is stationary will be captured as a blur, look for colorful backgrounds to use behind the area that the slit is capturing to create a more dramatic photo.

Good luck!
Mark

Reference:
 1. http://en.wikipedia.org/wiki/Photo_finish

0 Comments

Photography Class at Countryside YMCA:  What Time Is It?

8/26/2014

4 Comments

 
It was late October, and the rain was falling at a steady clip.  In photo terms it was "available darkness." For those of you who want an approximate guess at the exposure consider ISO 6400  @ f 2.0 @ 1/15.   That meant photo class that night was inside, and we were discussing exposure because for many photographers starting out that's a challenge.  Before you start cringing at technical-type talk, I want to share that we were laughing, and the atmosphere was very relaxed.  Then someone asked a  question casually, "Hey, what time is it?"

At that moment, perhaps because I was trying to guess what time of day a particular picture was shot, I was able to express what I have been taking for granted, but often think of when I hear that question.  For most photographers that question represents, "What is the quality and quantity of light? How is the weather? What season are we into now? When did it rain last? Where is the sun? and on and on.  The answers to these questions help photographers determine the best scenario for making pictures.  Yes, sometimes it is not in our control the "when" of a photo shoot, but that doesn't mean we can't be prepared for how to make the best use of the light we are given.  Yes, there absolutely is a direct link between the time of day when one makes a picture and the quality and quantity of light.

For me, it was a great teaching moment. I learned two things:  1) how light and time are intertwined for photographers; 2) though I contemplate light several times throughout the day, my students may not.  My job is to help connect, remind, inspire, teach, grow, and guide each student so that each can make choices that positively impact their work.  And in the process of sharing, we as a group have a great time "rain or shine" learning from each other.  If you'd like to see some of my students' work, check us out on Flickr.com; our group is "Two If By Sea Photography Group."  It is my privilege to be their teacher.
 
In addition to photography class, there are all kinds of classes for learning something new at Countryside YMCA.  For example, you can learn Spanish, how to play an instrument solo and in a group, sew dresses, make beautiful ceramic pieces; you can learn to cook, dance, act, study nature, make lego awesomeness, craft, and much more.  There are also many ways to make new friends, and volunteer in our community.  And of course, there are lots of wonderful wellness programs for staying fit physically; it is a place full of His Light where you can find encouragement.  I highly recommend you check it out as free classes for the community are going on now through September 7, 2014.

To register for Photography On Location at the Countryside YMCA,  which runs in 5 week cycles from September through May on Monday's from 6:45-8:15 p.m., go to www.countrysideymca.org, or call 513.932.1424 for more information.  The first set of classes, Fall I, begins September 8th, and runs through October 12, 2014.
  The photo below is from one of our class excursions, a photo walk, in downtown Lebanon.

Add Comment 

Photography Student in Lebanon, Ohio photogrpahing scenics
4 Comments

    Mark & Cathy Lyons

    Creative. Photographers. Deep thinkers. Persistent. Disciplined. Press on. Dedicated. Artistic. 

    Archives

    February 2015
    January 2015
    August 2014

    Categories

    All
    Available Light
    Basic Photography
    Bear
    Chocolate Labs
    Circular Flow Camera
    Countryside YMCA
    Exposure
    Finish Line Camera
    Finish Line Photography
    Inspire
    Learning Photography
    Motion Picture Cameras
    Our Mascot
    Pet Photography
    Photo Finish
    Photographic Techniques
    Shooting In Snow
    Teaching Photography

    RSS Feed

    Categories

    All
    Available Light
    Basic Photography
    Bear
    Chocolate Labs
    Circular Flow Camera
    Countryside YMCA
    Exposure
    Finish Line Camera
    Finish Line Photography
    Inspire
    Learning Photography
    Motion Picture Cameras
    Our Mascot
    Pet Photography
    Photo Finish
    Photographic Techniques
    Shooting In Snow
    Teaching Photography

Lyons Photography, Inc.
​Travel. Teach. Inspire.

    contact us:

Submit